Showing posts with label Designing. Show all posts

Tuesday, May 20, 2014

Rockin Chairs !!!!!

People always wonder what I do to make money to stay alive because everyone thinks all I do is build crazy projects for myself all day.... Then I explain I don't really make any money and am poor because I am addicted to what I do and spend all the money on cutters and more material to build more stuff...

Then they understand and offer to foot the bill for dinner...

End of story....


But when it comes down to what gets me that little bits of money to move to the next personal project here is a good example of concept to reality and working with designers and engineers to make it happen.

I teamed up with Lukas of Shibuleru Designs out of San Francisco about a new type of outdoor chair he had designed. He had the design and drawings pretty much fully locked down but it was on to me to do a lot of the little tweaks in the prototype and to do all the parts to allow it to be broken down to fit in a box and lay flat.

Just a really cool example of putting the cherry on top working with the designer/engineer to make a product just a little bit more rad but not straying from the original design plus it kept me alive and building another month....

Turned out super rad and glad to be part of the building....

Bent up the first set of parts without the arm rests.
If Gabe is going to take my job then hes gotta to learn...
Plus I like taking photos..
Hes welding in the connector pieces
On to the K&T mill to put the holes in for the arm rest bars...
This is the first prototype so its all learning for everyone at this point...
Lukas showed up once we had the first prototype welded up with the prototype cloth.
Its kinda fun when you get to this point in the concept to see all the things come together...
Its always a guess if you got the number right and the feel correct....
This time... we were soooo close but some adjustments to the geometry would prove the perfect fix.

I started the next group of adjusted geometry chairs that would also break down for shipping to Italy
 
Lukas finished up all the arm rest design and then I realized he only wanted them on the inside of the frame ( as you can see in the photo they are on both sides of the arm rest) so I had to cut off the one side of the laser cut sheet metal arm rest... no worries, small details...

The bolt together design is really neat...
It is a total of 5 steel pieces per chair and the fabric, then shipping all flat in a box designed for bicycle frames makes it really easy for everyone.
This is a close up of my welding, root pass with steel rod and Bronze over for the big radius.
I put a long bolt in it to show the hardware location all hidden under.


SOOOOO COOL
Love the black!

Close up of the bolted together pieces..
can't even tell...
Also a close up of the aluminum pieces SeaPort Laser Service cut and Metalco Anodized in a flash for us. Looks great.

The yellow was really neat!
Took me a bit to really like the color but I was sold with the fabric on it.


Quick drawing of how the seats work with the fabric.
 
Enjoy!!!
heres the link again


Thursday, May 8, 2014

CAM Mania... The 10 hour rush job....

When the phone rings most of the time for rush work there is normally a time line to get the work done like 2+ days or so... Like normal it was Anthony from HSMworks on the phone with the request to design and build a quick trophy to give away at the event the next day for the launch party of Autodesk Inventor HSM 3D ( the intergrated CAD/CAM for designing and then machining parts in the same program).... I just laughed and said " you got to be serious Anthony, you can't call me the day before, your crazy!"

So like normal I said let me give it a shot and lets see what I can kick out by tomorrow....

I really owe HSMworks, Autodesk and NextGen and all the kids tied in a bunch of favors, really when I look back, meeting this crew has truly changed the shape of my business, skills and built a good amount of my reputation in the concept world because of the ability to kick out crazy 3D machined masterpieces in hours not days or weeks, I can't even imagine what I would be doing, who I would know, and where I would be had I not run in to Anthony while filming a TV show in LA, oh yea, plus I stilled owed Anthony like 50 bucks from Autodesk University in Las Vegas when I ran out of money and needed to eat, so I kinda owed him some favors....

With the clock ticking and less then 20 hours to complete.... I started to round up materials at the same time as my brain was trying to process what I was actually going to build.

Here goes nothing....

This was laying on the floor in my shop...
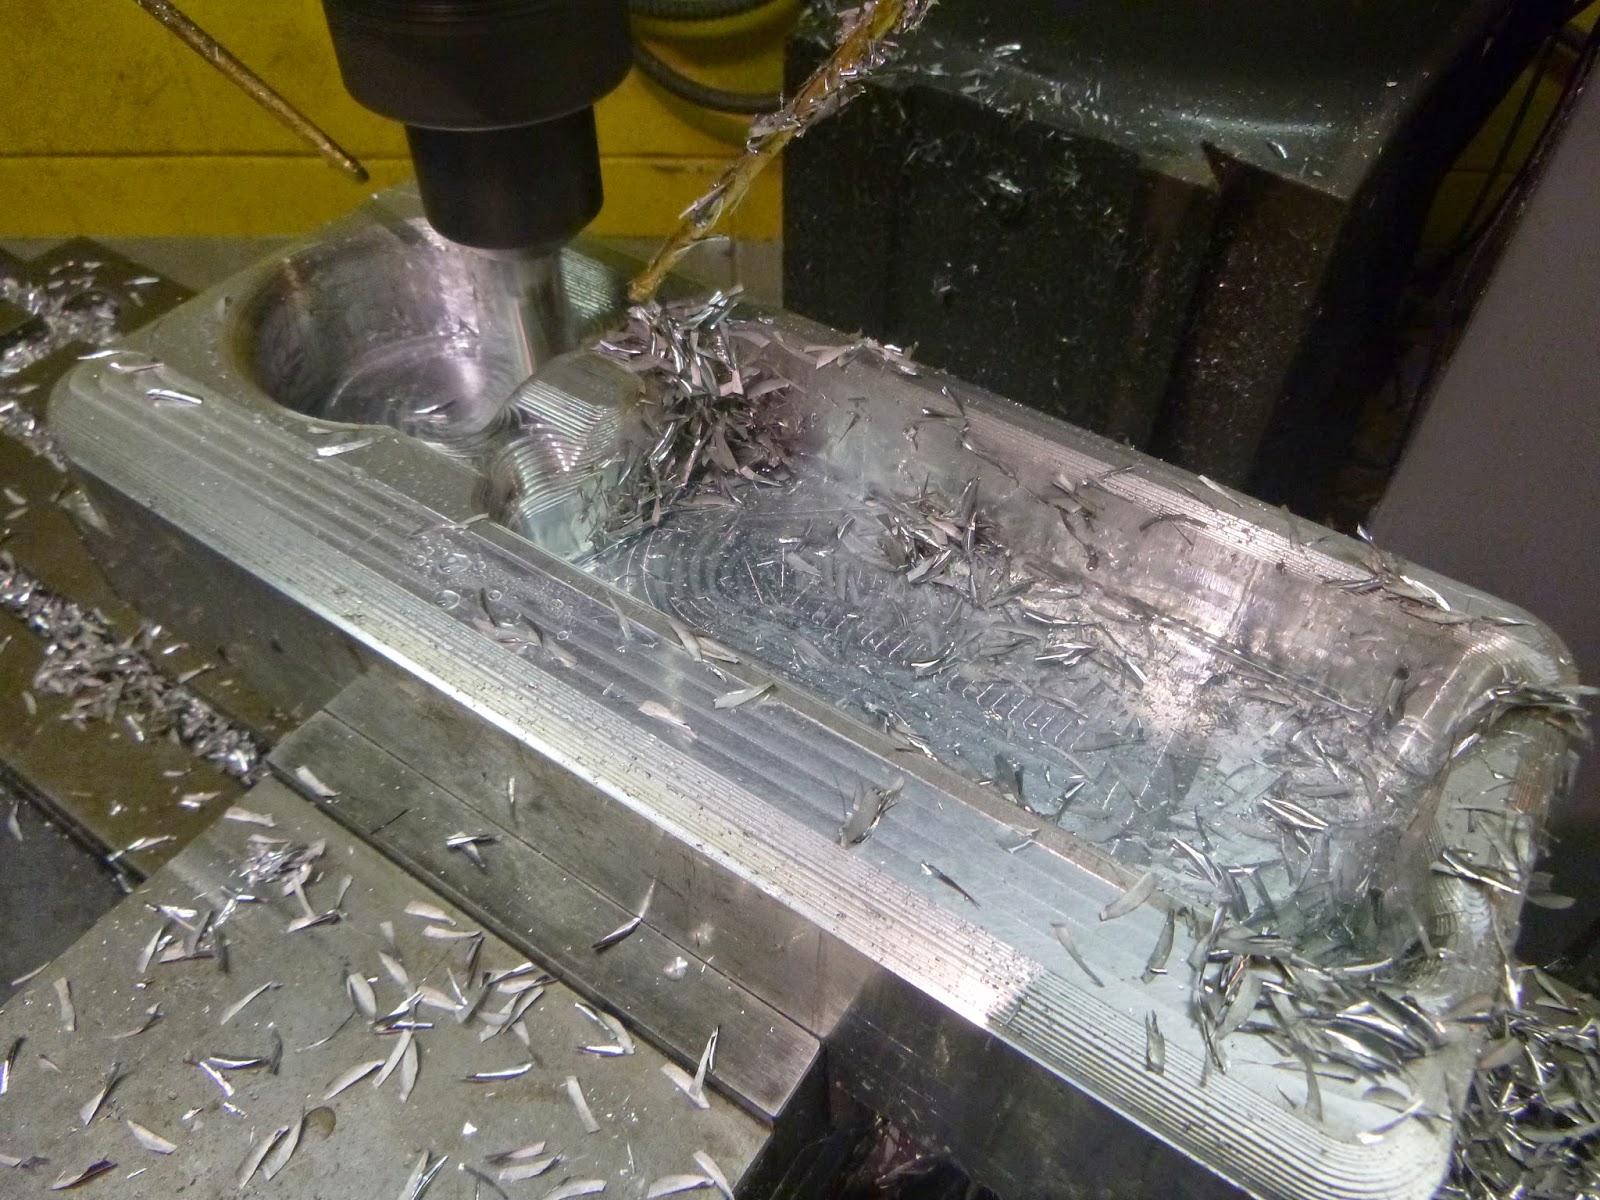
3x6x12 block of aluminum

I did a quick model of the idea in Inventor and did all the tool paths for it

Roughing with a 3ft 3/4 endmill

Making "Roaster Tail chips"

Time for the 1/2 3ft ball endmill and a lot of surfacing

When making a trophy for a contest that involves toolpaths and the idea of machining you know "EVERYONE IS LOOKING AT THE MACHINING"

The flip to side 2... I tried to only have to use 2 tools
My design really could have been done with a 1/2 endmill but I figured to rough it with the 3/4 to save a ton of time.

I used a 4-5-6 block as my stop for side 2

Almost done then on to the other parts.
I like to do all the 3D contouring then make one final pass around the part with a trace to make sure all the faces look perfect.

Because I had no time to make anything special or time to send anything to anodizing and with the event less then 8 hours away, I searched my shop for anything that was black anodized. The only thing I found was... A test piece for Red Bull Rampage trophies, another HSMworks project a few months back around August.  
Before I cut out the circle on the backside I engraved the Autodesk logo, I knew that I could keep moving all over the part until I got the logo just right. Once I got the logo just right, I cut it out roughly on the K&T horz. mill and then turned it perfectly round on the lathe.
As you can see the sun is coming up and the event was at 2pm so my time was ticking.
I put the logo in with a .001 press fit and did some locking nicks with a small chisel to really lock it in without any visible hardware or glue.  I also put on the little feet that I had laying around from an only Exploratorium project.

 
I needed some blue Acrylic, then I looked up on the wall and seen a left over piece from the Americas Cup Red Bull's Youth Cup trophy I had used HSMworks on as well about 8 months ago.
Ghetto machinist style I put a 2x4 wood board in the vise on the CNC and made a quick 3D sketch of the cut out it needed to fit, screwed down the oddly shaped piece to the board and cut it out. Quick and dirty

This photo is at about 10:30am... Completely smoked... but it was done..
Truly the software and my drive are the only reasons this thing can get done in that amount of time.
Its a advanced piece of machining you can throw a calipers on and measure if you don't believe me, with a turnaround of less then 15 hours from start to finish...


I arrived at the contest...
3 people that had held the fastest time at Autodesk University in Vegas for doing Cam Mania, a timed contest to see who could cnc program on HSM the fastest. All 3 of these guys happened not to be machinist or even have any background in machining, they all were Autodesk users in someway but not really on the manufacturing side of things. Think that made the story way better!


Then I jumped in on the photo and photo bombed it...
Because I don't care....
 
Enjoy


Wednesday, December 19, 2012

The unknowing drive..... for something......

My life is an odd one somedays and leads me in odd way.... I think living day to day is the key to my sucess and not being alarmed by any suprises that I encounter because of this poor planning....

But on the other hand it makes for a fun and exciting road with so many corners you can't see around that your bound for consitant surprises with lots of ups and downs....

I love my craft and my dreams.... Sometimes I feel like a snowplow pushing anything that gets in the way to the side and moving forward...

 Its stressful....

Sometimes I see things get pushed to the side that I feel could have helped me keep in control or move forward faster but my brain is this agressive plow born to push and make new tracks.... where those tracks lead to on that crazy road is still unknown, as life is full of surprises.....

I set a bunch of goals every year and write them all down on a piece of paper, then cover them with clear tape and put them on my wall leading to my bed room so that I have to look at them everyday....

 This shitty looking piece of yellow paper covered with written goals for that year looks really nasty on the wall, but is totally needed ... I hit a few goals and they made me smile.

Time to set new goals for 2013.... Holy shit talk about raising the bar for myself.... I slept on average about 4 hours a night this year just to make some of the goals that I feel are totally worth it. This next year for the MLS company and myself personally are going to be setting the bar even higher with some bigger projects that are going to twist some brains...

Get ready ....

When I get super busy working on stuff that feeds my shop, I sometimes forget about why I do this stuff and the need to stop take a moment and do something for myself....
Sometimes it takes someone to tell me that... Someone I actually listen to and respect..

Tom Lipton is a dude that I respect.. Hes done the time in the shop and knows his shit! Its good to see these crafters out there and know that after 20+ years in metal crafting you can still do the same thing for your job as you do for your hobby and not get them all mixed up. So when he told me, get back to building that espresso machine because you need to hammer it out and finish it, he was right, sometimes I need that kick in the ass from someone that knows its value to remind me I got it I just gotta hang in there and finish it.

Some background on Tom ( if you want more info check out the rad blog "Nothing to strong ever broke "). Hes one of the best metal crafters I know and the US government thinks so too and thats why hes in charge of some big concept projects at one of the coolest US Gov. labs.

His metal working background leads back to making some cool stuff, such as the first prototype Independent trucks for skateboards, to crazy machines that produced products that are most likely in everyones houses reading this. Doing 20+ years of work in just about every industry leads to some really cool storys too, some of these are on his blog... I first heard about Tom while doing work for Clorox and all the stuff he and the crew built, so like expected it was my job to hunt him down and ask a million questions about making stuff...

His blog might give MLS a run for its money.... We might have to get more half dressed girls around the shop to get the hit counter going again...

The espresso machine has been my personal project for the last months.... I am not going to show you all of it yet because thats some of the surprise in it... But how about some teasers.

All the sweet USA made parts
from left to right
Copper - USA Pen - 800 watt heater - theromstat - high temp float switch

I go off of whats in my brain and what shape I want as I am spinning it
 
Because copper is such a crazy conductor of heat its super important to get rid of a lot of the material so it doesn't require so much amps to weld and also just reducing the weight and making more volume is a bonus for the little extra time spent machining it out.

Using a big 1" NPT tap, I put the treads in for the heater.
Notice using the tail stock to hold the tap straight... Just a tip... Thats why they put the dip on the end of the tap, just for the exact reason.


The spun copper parts of the boiler are 8 inch diameter but I don't have a hole saw that big so I will have to make a bunch of notches with the biggest hole saw I had. I love doing this work on the K&T mill.

still in the quest for more material removal ....
I decieded to mill out.

I did a quick mock up of the legs and everything to figure out where the best place for the heater,float and stuff would be before making the cuts in to the spun parts.
Windows in it and LED light ports ready to go.
 
One problem that welders do all the time
when preforming very important welds....
 
CLEAN THE DAMN FILLER ROD !!!!
 
Good way to mess up a million dollar project... or make something fall from the sky and hurt someone...
 
CLEAN IT !
 
 
Part safety is very important when you get to a point like this on a project..
One drop of the boiler and your done...
Tricks I have learned over the years in medical and aerospace work, is working inside shop traveler boxes so you don't have parts roll off your bench.
Tom has tricks too for doing small stuff by working in clear bags so you don't loose screws or small parts.  
I do a lot of the tacking and fit up with the part in the blue box for safety.
 
Old Timer photo of the copper welds
 

Getting stoked on it....
100% USA made so far and proud of it.
 

Monday, October 29, 2012

building a monster in a moments notice

During the Red Bull trophie build, I recieved a call from Chris the owner of Farley's Coffee. Over the last 10 years or so Farley's has been one of the big players in the bay area for coffee shops, having locations in San Francisco, Oakland and Emeryville and staying super involved with the community makes these places really neat.

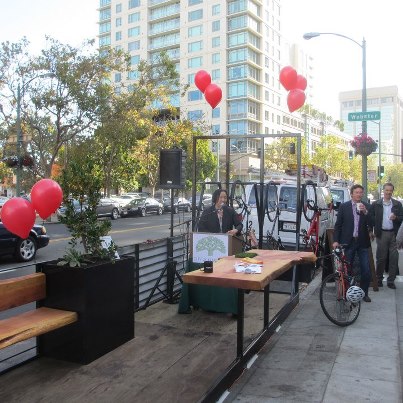
The question Chris had for me was if I could build a giant 30 foot mini park to be placed on the side of the street taking up 3 parking stalls, and providing all the things that a normal park has to offer packed in to a tight little steel chassis.

Like normal.... There was a catch..... It needed to be done in a very short time... and by short I mean under 2 weeks with the Mayor of Oakland waiting its arrival for a press release on "National Parklet day"

You ask what is a " Parklet "?

It is a small PUBLIC urban park, often created by replacing several parallel parking spots with a patio, planters, trees, benches, café tables with chairs, fountain(s), artwork, sculptures and/or bicycle parking.

The prints showed up and Gabe and I placed the order for steel and fired up the welder.

100 % USA made steel
2" x 6" tube and 3" x 4" Angle for the flooring
The MLS large scale fabrication annex ready for building
 
After I had most of the cuts all dialed in, Gabe started to tack it up as I did the squaring.
When doing these big frames, my secret is using clamps all over on it and using the clamps as points to attach Ratchet Straps to them and pulling them to square them up. Really easy way to get what you want when making it square.
 
No one said being a welder was a clean job
Putting the steel angles in for the wood flooring to sit on.
 
Hours later on day one....
We had most of the chassis hammered out.
 
With cut pieces of 1.5 square steel tube, I held while Gabe tacked in the verticals for the railing.
Having this covered area next to my shop is so rad, even in rain we can work outside, its so rad.
 
I made a bunch of fixtures to hold the railing together with the correct spacing.
Sometimes spending the 20 minutes making the fixture pays off big in the end, saving time, money and mistakes when your moving this fast.
 
Next was doing the bike rack.
With myself being such an avid rider, I had to make the rack hold 6 bikes not the 4 like people thought it should hold, I put the 2 extras inside the parklet.
Using my daily riden 1938 Schwinn Superior for testing the fit
Next for the wood for the floor.
Jesse setting it all up with lovely green treated lumber.
next is the big flower planters out of 3/16 sheet steel on the far end and near the middle.
 
 The next step was Jesse and I went out and did some shopping for slabs of redwood lumber
These would become the benches and table.
Once you find the piece you want...
They spray it with a bit of water to show you what it will look like once you do a coat of finish on it.
Really neat shopping for big slabs of wood.
This Redwood tree was from around the Bay Area.
 
 
By taking that single piece and cutting it down the center we made a matching back rest to the bench.
Matt to the right and Jesse on the left helping test the fresh cut wood.
 
With no time left, and a day before the mayor was due to arrive to talk about the city of Oakland and how it kicks ass, it was time to get the parklet out of the door. I put down a sweet paint job on it with some Epoxy black paint and it was ready to go out, with or without Jesse's finished wood benches. They would need to be installed at the site due to the time frame with getting the parking permets for the street for the install.
With a madman behind the wheel.....
Nothing else needs to be said .....
 
Trust me...
Hes becoming a better forklift driver everyday....
This just wasn't his day.....
 
Just for a photo and prove a point....
That two people can build a monster in just DAYS....
With a saw and a welder, the world is your playground....
 
As we do it in Oakland....
Work by night.....
With the flatbed down and the winch hooked up... we pulled it up on the rig.


showing up to Chris the owner laughing at us for doing this at midnight....
MLS style 24/7/365
 
Now for the hard part....
The unloading...
 
If anyone is going to drop it... I would rather it be me

Lucky we wore our brightest colored clothing for the drop off

On the ground and looking good

A beer was needed after that...

That next morning Jesse put some more finish on the Redwood.
It would need to be installed that day to ready for the Mayor the next morning

 
As planned the Mayor of Oakland showed up to a parklet with no grass because it didn't show up on time like normal. But it really didn't matter, there was a mini super tinny mirco sample on the table for people to get the idea about the grass which really didn't work that day but it really didn't matter, people were stoked.

With any parklet is the need for a giant banner.
If you want to see it....
Grand Street and Broadway in downtown Oakland.
Farley's East coffee shop.

Proof that the grass did get put down....
 
 
 Go Enjoy it....
 
You need more info and need one built and shipped out ASAP?
JT