Saturday, January 30, 2010

Sprocket brake for your Fixie

I made some goodies for the day.       Check-em

The idea is to use a stainless steel chainring and attach a disc brake caliper to the chainstay to grab the chainring as if it was a disc brake rotor. The rear wheel must be a fixed gear set up in order for the brake to work.

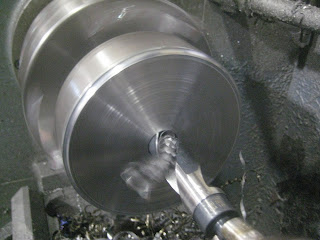
first I took a Surly stainless steel sprocket and machined it so it didn't have a lip on the back side. My first idea about 2 years ago, was just laser cutting a sprocket and for the last 2 years the 3D model has been sitting in my Solidworks software file waiting to be cut. I forgot all about the Surly Chainring and how perfect it would work for this project.

The mounts for the Avid Juicy caliper was super easy to make and weld on, plus it adds a lot of stiffness to the non drive chainstays because of its link to the bottom bracket.

I havn't done any of the routing for the hose because I didn't know how well the sprocket brake would work so for now the good old electrical tape will have to work.

This is on the frame I built for Brie before Christmas ( see older post ) so its will be my test bike and I will keep you kids up to date on the progress.


Before I did all the welding, I milled the bracket to save some weight

Underside showing the mounts

Done and done


Enjoy


Tuesday, January 26, 2010

Cutting a Classic

Its so hard to hold a grinder to a Lightspeed Titanium Bicycle and start cutting.

The frame had already been welded after being hit by a vehicle so making the cuts was a bit easier, knowing she would have been headed to the recycling bin.

Check it out


Titanium throws some rad sparks


Check it


The dropouts have a hanger on it just incase you want to throw some gears back on it
And how could we forget the bottle opener on the left side.

SPEED DOWNHILL - Forking good time

For some reason, I really wanted to build a supension fork for the downhill speed bike. I could have done a rigid fork and called it a day but why, thats the easy way out. Or just gone on ebay and bought a Cannondale Lefty fork.

 I like making my life hard.

Here is what I have and made so far. It is going to use the Cannondale Lefty wheels both front and rear but not on the left side but on the right side, so lets call it a Righty.


Ok check it, some red triple clamps from a Rock Shox Boxxer fork
Some Bronze bushings I made on the lathe
A slider tube and a outside tube and an axle


Here is the little offset axle for the lefty wheel
I made it a 2 piece part to save time because I don't get paid working on my own stuff I found out
The axle needs to be offset to a leading axle on the fork to make the bicycle turn and control correctly


Heres a better picture of all the little parts I made.


Ok, here is the axle and all the goodies welded up, you will see whats next.


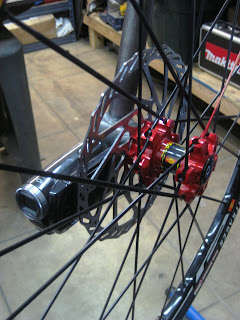
No downhill speed bike would be complete without a little HD camcorder
I made all of the parts removable so you don't have to leave it on the fork if you don't want it


Here is a good picture of the one sided wheel with all the stuff mounted.
I am stoked to use the little HD camcorder with the SD memory card because when I crash up in the canyons, I don't think it will damage the memory card so I should be able to post video from my hospital bed.


"THE FORK"   TO BE CONTIUNUED------------

Monday, January 25, 2010

My last RSD project

Here is the last project I worked on while at Roland Sands Design. It was a 2009 Honda CBR1000 that we took all the body work off of and made some custom stuff for the naked street fighter look. It turned out really cool and now the time has come to WIN THE BIKE.

It benfits the Ride For Kids and tickets can be bought online or during the motorcycle expos around the USA. 

Its a stupid fast bike and I would love to have it, but I can't win it even if I tried. So I am one less person that you need to worry about when buying tickets to win it.

http://www.rideforkids.org/

Saturday, January 23, 2010

How to pay the bills

People ask me a lot of the time how I make money to have fun. 

Good question.

Answer - I don't know?

Here is a good example that brings money in the door.

These are swing arms ( rear end ) for Harley Davidson Softails. Some times its like a factory around here. I don't post a lot of that stuff on my blog cause I feel like a sweat shop doing production stuff and I wouldn't want to bore anyone.

Behind the swingarms is a red case filled with crazy expensive inverter Tig welder that I use for doing repairs at restraunts around LA. The best part of this job fixing kitchens is I can trade welding for food. Then I take Brie out and look like a high roller, ha ha.

I have fun doing all the jobs.


Friday, January 22, 2010

The New Kid in the shop

Here is the new beast I have added to the shop.

Long story short - I made a visit to a Sears Outlet center and bought this little CNC machine for $125 dollars because they thought it was a planner for surfacing wood.

I saved about $1700, not bad, I don't win lottery tickets or anything else but every so often something good comes my way.

I ran it for the first time the other day and was super impressed. Its loud but really fast. Expect to see some cool projects coming.

Check out the video for the machine.

Thursday, January 21, 2010

She is half done Jeff

My project for Jeff Thrasher is coming along

I got all the Reynolds tubes notched and cleaned. Its only a 58cm but its one of the bigger bikes I have built, I keep on thinking I have measured something wrong because the Downhill Speed bike is so small ( BMX ) sized, seeing all this open space is really throwing me off.

So far, everything is looking good. 


The plan - To build a new aged Iver Johnson looking Track Bike that folds up to fit in a suite case so it is easy to travel with, no more oversized fees at the airport

The Catch - It needs to look like it doesn't fold and needs to follow the lines of a classic Iver.

As I get closer to putting the rear end on the bike, it will make a bit more sence, how the folding will work.


I welded the bottom bracket on already


This is a buddy of mine's Iver in his bicycle collection - I am using this photo for the frame design
It is a late 1800's Iver Johnson Custom Track race bicycle


 Heard of Iver Johnson or the name ring a bell? 
           Thats because they were one of the biggest firearms manufacturers from the mid 1800s to the early 1990s well over 100 years.

 For a while, from the late 1800s to the 1940s they produced bicycles  and motorcycles due to their great knowedge in manufacturing. You can thank Major Taylor in the late 1800s for putting the Iver Johnson bicycles on the map. Major Marshall Taylor was the fastest racer at the time, to top it off he happened to be one of the only African-American bicycle racers during a very strong racial time. He was so fast that he lapped on the track, every one of the pro racers during a 1/2 mile race.
A few years later he became the world champ on his Iver in 1899.

Iver Johnson Firearms, Motorcycles, Bicycles , Toys and so on are still around today because of the fine craftsmanship in every detail, they go down in my book as a inspiring company because of of many reasons. If you want to read more search it up, its a really cool when you read about all the patents and ideas they had over 100 years ago. They were ahead of their time in idea and product.


Wednesday, January 20, 2010

The little machine that could.

Here is a picture from a photo shoot I did a while back. I was doing a burnout downtown Malibu for a European magazine.

The bike was built for Adam Stark, It took me about 6 months to finish it up. It makes a little under 100 horsepower and doesn't have a problem spinning the tire, not bad for a Harley Sportster.


Running From The Heat

Some time back a " friend - no name given" decided to run from the cops on a beach cruiser = access denied


He made a good run for it - but do to his KICK ASS shirt he was spotted by cops and later bagged

Monday, January 18, 2010

My Helmet Hall of Fame

As a welder, your helmet is like your second face.

Personalized helmets are cool and tell something about the person welding and who or what industry they work in. Stickers or pinstriping are always a cool thing.

 Each helmet is a bit different, if you wear it most of the day comfort is everything. I have tested almost every brand of helmets out there over the years, some of the worse helmets I had to wear for TV show sponsors and such others were pass downs from old welders who believed they had the best helmet and wanted to give it to me.

I have about 5 helmets at my shop, mostly for teaching welding as student helmets, but some are my old helmets from production or TV shows.

Here are some of my lists of stuff that is the most important in order when picking out a helmet.

1. how the headgear fits around your head and the shape of it. #1 - if your not feeling good, you won't weld good.

2. How easy is it to flip up? Does your hand have something to grab in a split second to lift it up?
This is VERY important in a production environment where speed is everything. If you need to lift 6 times per part, at the end of the day you could have welded a few more parts because of the seconds you lost lifting which could land you on the unemployeed line.

3. If the welding helmet is auto darkening, is it adjustable for the shade?    9-12 or is a 9 or 10 only.  Depending on how much welding you do, a helmet with a 9 lens can cause eye problems, just running a 10 shade can fix this up to about 150 amps, then you should amost go to a 11 darker lens for anything over 150 amps

4. If you use a MIG or ARC ( stick ) welder, the front area of the helmet shouldn't have a low spot. For example - if you are welding the exhaust on your car laying on your back, if sparks fall while welding and lands on the helmet you don't want to give them a place to sit and melt your helmet, you want them to fall off the face of the helmet before causing damage.


Here is a bunch of pictures of my helmets in my Hall of Fame - each helmet has over 20,000 arc strikes, TV filmings and stories.


The Miller Elite Big Window
Cool looking helmet but felt weird
I kept it at Edelbrock for welding concept projects

Grain belt, D&M cycles, and Taco John's stickers all over


I had a ton of stickers on this one for fiming a few Discovery Channel shows and friends companies.
The old company before Monkey like Shiny - Metal Morphosis Cycles

This helment is the fastest fliping helmet out there, I think.
Because there is a lip above the solar panel, you can grab it in a flash.
It feels more natural to flip above the solar panel then below my chin at the bottom of the helmet.

My current baby
The Lincoln Electric Trackside Platium
I can wear it for days and never know its on my head !
I have Peter Fonda (Easyrider) and a good old Wyoming Sticker for the kids


Nothing makes you feel like a pedifile at a new job more then a Hanna Montana Sticker
All the pinstriping on the bottom with my name wore off - my hommie Thick put it down for me years back.


Hope my years of good and bad helmets helps in your quest for a new helmet.

Now go weld !

Sunday, January 17, 2010

The New York 400 in Downtown LA?

Brie and I were at the New York 400 Indy car race downtown last night

 Well, it was just a movie set for the TV show CSI New York but kinda cool set up, it was a complete race track for a pretend Indy race in the city, called the NEW YORK 400.

We were just checking it out and saying hi to the crew, I really was in to the race cars. They were Suzuki GSXR1000 sport bike motors in the little race cars. It would be so much to get to rip these bad boys on the track.

In the video the red car is hooked to the crazy fiming SUV and then there is a black race car that is driving under its own power,  then the Honda CB1000 motorcycle with the custom side car had a camera guy on it for side shots. Its crazy how much work goes in to a 20 minute show, I bet they will only use about 15 seconds of this 18 hour day of filming.


Friday, January 15, 2010

Want to be a good welder, need help?

Here is what I found on the internet.

I think I might get it tattooed across my chess, even with the welder I don't know.


What do you think? Chest or Back

Just kidding, figured I would scare you mom with the tattoo part.

Thursday, January 14, 2010

Aerospace Party time

Well, I got to make something today that might fly...

Rodney's TOP SECRET parts for a Concept Remote Control Helicopter

Wish I could tell you more........ But I just can't


He called in the big guns to pull off this huge job !!  ( real penny )

Tuesday, January 12, 2010

Spinning some parts

I have a lot of projects in the shop like always but the high priority goes to my bicycle projects, this one for Jeff Thrasher.

I want to tell everyone what I am building but thats half of fun not telling you until we get closer.... So stay tuned


The headtube I spun out of 4130 Chromoly steel and is a full Cane Creek style intergrated bearing style.


The custom bottom bracket with the bearings on it I also made out of 4130 chromoly. The bearings are out of a Cannondale mountain bike headset, they work perfect for a bottom bracket pivot.

The nothing machine

Some time back,   

Rodney asked if we would help him on a project he wanted to do.

The idea -   To build a crazy mechanical machine with gears, chains, links and motors. At the core would be a type writer, the gears, cams, links and chains moving everywhere but at the center the type writer typing over and over again the word "NOTHING" in all caps.The machine would be call the nothing machine.

We worked for about 3 weeks on the project, Rodney running the show, Wiggins making parts and myself doing what I do or something like that.

The goal at the end of the project was for the coffin sized machine to travel with Toyota's Art Tour around the USA, while generating donations for the various non-profits by the sales of the pieces of NOTHING. ( small framed pieces of the machine's output paper with the word "NOTHING" on it) Some greater sales came from the sales of wooden boxes filled with the NOTHING paper but also pieces of metal or parts from the fabrication of the machine, these boxes brought in hundreds of dollars alone. I am in the video loading a box with ball bearings from the little steel man, which later sold for 50 dollars, ha ha, not bad.

The video is a bit choppy, I made it a long time ago and used a ton of about 15 second clips I had on my digital camera. I am really surprised that I even had enough to make this.
First check out the machine then watch the movie.


All the little preloaded picture frames with a piece of NOTHING


You can see the motor at the bottom and the type writer


Enjoy.  It costed Rodney a lot of money !

Monday, January 11, 2010

the good old sticker door

While, I door stuff that isn't fun to take pictures of ..... AKA shop cleaning after the crazy month


Here is a picture of the great support sticker door......


Always adding ..

Friday, January 8, 2010

The PRINTING PRESS - DONE !!!!

Well Goose and I have put the last few touches on the roller press tonight. Goose has wanted to build this thing for a long time so I didn't build it for him but just helped him along the way because I had to do something, cause its a really cool project and I really wanted to step it up and do it big. Its a simple idea of a machine but not so simple to build.

This is a photo of a roller press found on the internet.
This machine may be from the late 1800s or so
If only we could cast steel and make cool looking stuff like they use to.


Check out the photos, the project.

 It uses a negitive raised image with ink on it, then you lay it on top of the paper, next you put the foam and felt on the top and run it between the big steel drums.

The pressure between the rollers pushes the ink from the negitive image on to the piece of paper below it and your poster is done, then you repeat for the next poster. Its produces a unique print because it is very repeatable but there will be small differences because of the speed you crank it or pressure differences or if more then one color is used there can be all kinds of things different. 

The frame of the press was build by Goose and he used the Mig welder to put it all together. He did a good job making everything and doing all the tube notching for the frame. With not much experience behind the welding mask, I helped with a bunch of quick welding tips and he was off welding. He pulled off some good looking welds that will last the life time of the press.

The rollers were a big job because of the size and weight. We decided to buy some giant steel tubes from the steel supply company, the problem was they were really dented and scratched up tubes thats why we got them for cheap. But because the tubing walls were about 1 inch thick there was more then enought material to remove to make them straight. We machined the bars and inside supports for the rollers ( pictured ) and the end caps. I Tig welded the rollers together to help control the heat and not allow the shafts to bend.


Yep, thats a big block of steel
These are start of the internal supports of the rollers.
There is 4 of these per roller at about 20 pounds each


I machined the faces and then drilled the hole for the shaft

Each roller is a bit over 100 pounds, so the next problem was feeling safe with them spinning on the lathe while I tried to make the surface butter smooth. It took hours and hours of machining and polishing to get them to about .010 of an inch or about the thickness of about 3 pieces of paper for tolerance. If one end is smaller then the other, when you press a print it might apply more pressure to the big end making your print very dark on one side and very light and short on ink on the other side. The rollers needed to be near perfect.


Here is the two rollers
Each one is over 100 pounds
and as smooth as silk


The last part was just putting it all together. It kinda fell together, everything was custom built but really planned out.


This is Goose putting the table bearings on and making sure everything is running.
This machine is bigger then the old press pictured above, the rollers can do prints up to 40 inches wide.


Here it is all done with the gear drive, crank, table and below storage


This is a close up of the table
from bottom up
1 inch fiber board
Lexan sheet 3/8 thich
Felt
Foam
The paper and negative image die goes between the Lexan sheet and Felt

Enjoy

Thursday, January 7, 2010

Tired.........

Beside making custom motorcycle handlebars, I managed to escape the shop today and drive to Fairing.

The place is where most small bicycle frame builders order their special tubes and weld on goodies to build frames. The project at hand this week is to design bicycle guru Jeff Thrasher a cool custom ride. I like to go out to Fairing to pick out bicycle specific tubes sometimes before I start to really design a frame, because I kind of have an idea what I can work with. I will lay out some sketches of my ideas in a day or so.


I need to get done with these handlebars for this motorcycle, its crazy that people still come to me and ask me to build Exile style stuff. I worked at Exile Cycles years ago and that was what brought me to California. Russell Mitchell helped me and made sure to get me in front of the camera while we did a bunch of tv shows for Discovery Channel, TLC and Speed Channel.  It was crazy being a young kid getting thrown in front of a camera, building these handlebars kinda gave me a flash back to the good old days, years back and how much I really didn't like making these style of bars for various reason.......

Sunday, January 3, 2010

Back to work ~ !

Well, I hope everyone's holidays were great. It monday and time to start work again, the partying is done.

I tried to do all the welding on the high speed downhill bike on New Years day, which was a bad idea. It turned out ok but I wish I could have really tore it up and put down some of my top notch looking welds. I had to take a break mid-day because I felt so sick from the new years partying....... Long story short, there is a reason they give you the 1st off - they know nothing productive is going to get done.

Here are the welds from the headtube, because of the super small headtube, I made sure to put down a little bigger sized welds then I would put down on a normal sized headtube.


The tail on the speed bike is going to be none other then a hip 1970s light. I took the guts out of the light and kept only the cool alunium shell. It just makes life simple for me so I don't need to make some hand rolled aluminum tail. You can kinda see the cut lines on it, I won't keep most of the light, only the part with the #5 on it.